Mike "SamuraiPaddler" Moser

|
|
At Indy's request, I thought I'd put together a little write-up on how I printed my RF-4B decals.
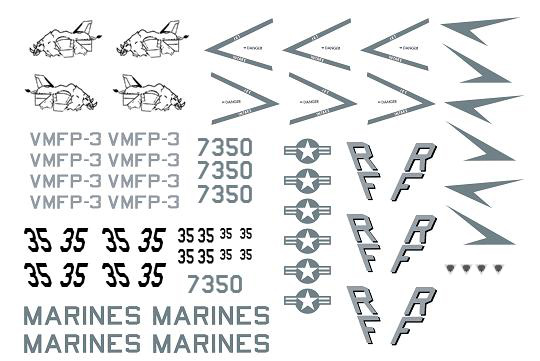
The first thing you'll need is the artwork. That can be as easy as scanning in an existing decal
sheet or as complicated as making everything from scratch.
In cases like the rhino on the tail, I was fortunate enough to find a solution in-between: a
head-on photo of the rhino art I could crop out and clean up. In the case of scanned-in artwork,
once it's in your image editing software (I use Photoshop) you can change colors (as I did to
all mine - I changed them from color to grayscale) and otherwise alter what you scan in.
In the case of photos used for artwork, those will usually need some clean-up and color changes
as well. Exactly what you need to do is determined on a case-by-case basis, so it's kind of hard
for me to go into detail on so broad a topic. In my case, I was able to cut the black rhino
artwork out of the tail image, then paste it in a clean image and "massage" things to get them
looking good enough to be shrunken down. At this point I paste my images into PowerPoint. I
like PowerPoint for several reasons...
1) It lets you see exactly where on your page of decal film the artwork will be printed.
2) It lets you quickly, easily, and accurately resize, move, and copy your images.
3) It lets you make text directly without having to paste it in as an image from image editing
software.
 |
 |
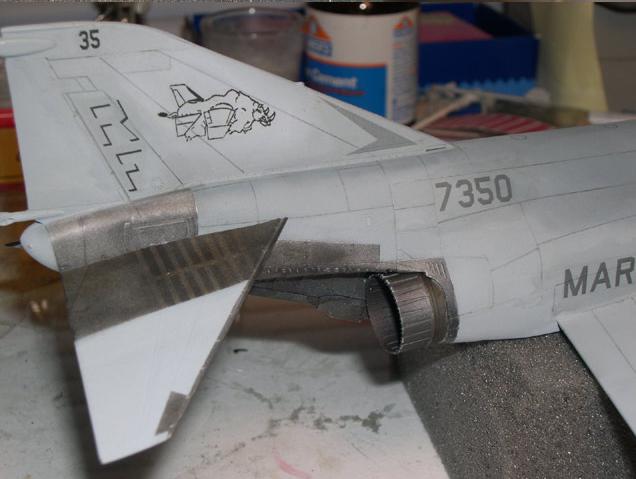
If you have the correct font, you can make text of any size you need right there in PowerPoint.
Once an image is pasted into PowerPoint, editing the properties of that image will reduce it to
the size you need to put on your model. In many cases, this comes down to eyeballing - for example,
if I see the "MARINES" text sitting between two panel lines in a photo, I measure the distance
between the same panel lines on the kit and make my "MARINES" text big enough to fill the same
general space. It's not science - it's all art.
That's the general idea of how I get the images to make into decals...scan orcrop from photos,
paste into PowerPoint, and add text in PowerPoint (if you have the right font - otherwise, get
that from a photo as well).
In the absence of PowerPoint, you can paste each image you want to print on a unique layer in
one large image that's the same size as the piece of decal film on which you'll print your
artwork. This will give you the same feel for where on the page your art work will be.
|
|
 |
 |
For decal film, I've been using Detail Master's film (http://www.detailmaster.com/).
This isn't because I've tried a lot and decided I liked Detail Master the best, it's because that's
what the hobby shop had so that's what I've been using. The film is VERY thin, which can be a
blessing or curse depending on your preference and method of moving a decal around after it's on
a model, and it comes in clear and several colors.
That said, I can't see it making much of a difference what you use. Prior to printing, I brush
Microscale Industries, Inc's "Liquid Decal Film" on the area that will have the artwork printed
on it. Once the artwork has been printed, I go back over it with another coat of the liquid
decal film. This helps keep the ink from chipping off - but beware: ANY time you have to cut
very close to the ink, the possibility for chipping exists. The ink dries brittle...so know
that you might not be able to cut along a printed line without the ink making that line chipping
off the paper (even with the liquid film over it).
Printers, of course, vary - one thing I've found is that on the laser printer I use, I get the
best ink adhesion when I choose the "Heavy Glossy" option as the medium onto which I'll be
printing. If your printer has this option, I'd suggest you use it. I think it prints more
slowly so the ink has more time to dry so it doesn't smear. If you have an ALPS printer, you can
do almost anything. I don't have one - just a laser color printer.
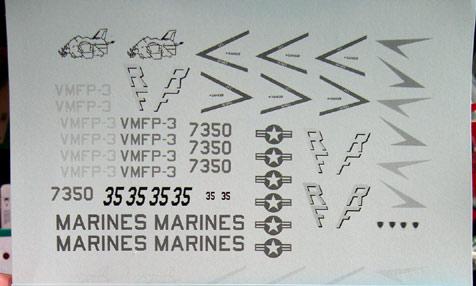
I've found that all colors printed on clear film show up translucent when taken off the backing.
Putting them on a white background fixes that... but then you need to cut white decal film (or
paint a white area) to put underneath your artwork so the colors will show up correctly. I haven't
had much success with colored decals - unless you can get the background white.
Luckily, all the RF-4B markings were black or dark gray. In the case of something like white
letters on a dark blue plane...I can't do that with what I've got.
I'd highly recommend making a dry run when printing - print on paper first, to make sure
everything will turn out the way you want. Also, be sure to include PLENTY of extras. Ink can
smear, chip, etc. so always print more than you'll need - you may find you need more than you
thought.
 |
 |
|
|
So there ya go - not much to it, really, so long as you have some graphics creating/editing capability and you only need black or dark grays.
Hope you find it useful!